Showing posts with label handmade. Show all posts

Wednesday, January 25, 2017

Polymer Clay Classes are Back!

  Polymer clay has become a powerhouse of opportunities for people to express themselves.  It can behave as clay, fabric, paint, and more.  The scope of possibilities can be seen on any bookstore shelf that has more than 5 books on the shelf dedicated to it.  It is accessible to the home hobbyist and super-star artists whose work is found in museums.  Just like any art technique, it is best to start at the bottom and work your way up if you are starting from scratch.  Building a foundation of steps will afford you an arsenal of skills that you can have at your disposal when you decide to create something new.

  The year 1995 was the start of a 20+ year love affair with polymer clay. It became my sole expression of choice.  The clay satisfied any mood I felt or wanted to create in a piece of jewelry, set of unique buttons or small art pieces.  I created my company Ovenfried Beads, and my "claim to fame" was the Stacker Bead.  The volume of Stacker Beads that I made allowed a full and long-lasting line of jewelry that found popularity locally and around the world.  Mokume Gane, surface textures and stamps, and other experimental techniques that have no name are my favorite techniques.  Combining polymer clay pieces with bead embroidery, like here and here, is an extremely fun way to make your clay work pop. The multi-media possibilities are endless.  Just check out the book 400 Polymer Clay Designs and let your mind be blown~!

  Now I am again offering my popular private polymer clay classes for adolescents and adults in the Greater Cincinnati Tri-State area.  My classes are a LOT of fun, but I take them very seriously and want to offer the best instruction. 

Beads made from cane slices from class.

Basic Cane Building   -   Students will learn how to layer different colors of clay to create a cane or loaf, that when sliced, will reveal the same pattern per slice.  (Think of sushi.)  Four layering techniques will be taught, then if time allows, students will be able to experiment.  Use of pasta machine and long blade and piercing tool.  
Go crazy with color or monochromatic for a more subdued effect.


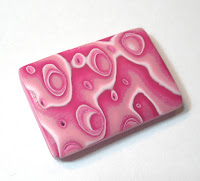
Mokume Gane   -   Mokume Gane is my favorite technique, achieved by layering several contrasting colors of clay into a brick, distorting with piercing tools, and slicing to reveal elegant wood-grain-like organic patterns.  Each slice is different.  Use of pasta machine, long blade, variety of piercing tools.


Extruder Cane Fun  -   Clay extruders provide a way to create small detailed canes.  When the right color combinations are used, eye-popping designs result.  This class will focus on the grid design you see here.  Use of clay extruder and sharp blade.


Commercial and hand-made stamps used in these leaves.

Texture with Pearl Surface   -   Choose commercial stamps, hand-carved stamps and textures from unexpected places.  Add some pearl powder to give a jewel-toned sheen and accentuate the surface shapes.  Use of pasta machine, long blade, stamps and texture tools, a variety of shaped cutters, pearl powder and polyurethane coating.


Stacker Beads   -   Stacker Beads look tough to make, but the technique is simple.  With practice you can make your own Stacker Beads and WOW your friends!  You will create both beads feature above.  All you need is your hands and a long blade. 

   Fine print: 
There is no supply list to purchase, as the class fee covers the clay and use of my large selection of tools acquired over the years.  If a student has clay and tools they previously purchased, it is fine to incorporate them into the class, but the class fee remains the same.  You can come to my beautiful home on the West side of Cincinnati or I can come to you.  If I come to you, I will have some space and electric plug requirements, and I only teach in non-smoking environments.  Very young children and rowdy pets are distractions that will slow the process and diminish your experience, so plan accordingly.  Good dexterity is necessary in both hands.  Students keep all of their creations...including beads, buttons, pendants...whatever the student makes. Basic jewelry construction is not covered, but can be a separate class if desired.  I prefer to keep class sizes 1-4.  Cost:  $65 per 4 hour session or $75 per 5 hour session,  per student, ages 10 and up.  The class categories above cannot be combined in one class, but multiple sessions can be scheduled if one desires to learn more than one technique. 

To see more of my current work and stay tuned to what is happening, follow my AmyEclectic page on Facebook or AmyEclectic on Etsy.  Interested in scheduling a class?  Contact me here

Thursday, November 10, 2016

Birth of My First Art Quilt

Over the years I have created a lot of quilty fiber art things.  Not traditional blocks, except maybe a log cabin with random fabric strips, but mostly made up.  Never really anything pictorial. Until now.  You can click on any of the photos to see them in a larger format.

A couple of weeks ago I was walking home from the bus stop and was intrigued by the cracks in several segments of the sidewalk.  This sidewalk is just a couple of doors from my house.


About 4 days later I sketched it out on a white piece of paper.  I liked the vertical orientation of the shape, and I shaded around it so I could decide what area would be a strong focal and what would be the "outside" of that shape.


Then I drew it much larger on a paper grocery bag.  It's a good strong paper to use and is a great size.  No gridding was used...it was all "eyeballed". This is a closeup of the larger piece.  I assigned letters to the segments in the top half, and numbers in the segments of the bottom half.  If I were to sneeze or the breeze blows in the studio too hard, I'd know at least which half the cut pieces would belong to.


Then it was time to trace it onto tracing paper.  Michael's had a sale on it, so I was pretty lucky.  Here is part of the piece in it's segments cut to size and roughly arranged in it's intended shape.  I worked on the complex inner part before I traced and cut the outer part.  The area you see below was going to be in the brown family to symbolize the strength of earth and rock.


 Then came the fusing.  I used the cut tracing paper pieces to cut out the pieces of fabric for each piece, allowing about 1/4" allowance around each piece so when I attached it to the fusible paper, I could cut them precisely.  Then I placed the pieces on the sticky side of the fusible paper (right side up) and ironed.


Now it is time to cut.  I used a brown marker to make the edge of the actual piece easier to see.


(Keep those scraps!!)

Next I placed the cut pieces (with the paper still on the back) on the original template to make sure they were cut well enough to fuse onto a backing fabric.  Looks good!


Now it is time to work on the background.  Here are the pieces of tracing paper laid out, ready to match up to fabric.  I chose blue hues to represent air and sky.  I didn't take pics of all the steps of making the background.

Here are the pieces of fabric fused in place.  I took a break from taking photos because I wanted to make sure the placement was good before I fused the pieces with a steaming hot iron.  Once it's down, it's down.


Next step....bring it all together.  I added some fabric "pebbles" I created a couple of years ago for situations just like this.  When you need some kind of additional design element but you don't want to have to create a whole new stack of stuff to work with.  The oval of pebbles visually holds it together very well and I think it helps balance it and keep the eye within the piece.  I used brown hued pebbles on the blue fabric, and blue hued pebbles on the brown.  Nice earthy contrast.  I also added bands of blue to the top and brown  to the bottom to contain the image and cover up the wonky pieces.  I think the brown base really looks like a stable ground now.

Now time to free-motion stitch!  There is no batting sandwich here yet.  Just the fused pieces to solid black background.  I went around the shapes several times to "blur" the hard lines.  The circle of pebbles is surrounded in a nice light grass green color to pull out the greens in the pebbles.  You'll need to click on these photos to see the stitching.


Here is the back before I stitched around the blue segments.  I wish I had taken a final back picture before making the quilt sandwich.  It's a little blurry but you get the drift.


After I made the quilt sandwich, I sewed a single line around the outer edge of the brown center shape.  This was enough to hold the layers together.  This will not go on a bed, so I'm not worried about batting slippage. This next picture is after I sewed the binding onto the front and wrapped it around the edge to the back.  The Wonder Clips are great because you don't get poked.


Hand-stitching the binding on the back is one of my favorite parts besides designing the piece.  I didn't photograph that part.  I just wanted to get it done so I could take this last picture of the finished piece.  It measures 16-1/8"x23-1/2".  Wanted to get this step-by-step on the blog so you can see how I made this.  I don't have a title yet but I do know that I am going to tackle some other broken sidewalk pictures and create a series.  Hope you enjoyed my photo journal of this process!


If you like what you see here you can get other craft updates on my Facebook artist page.  Lots of creative fun happening in the studio! 

Monday, December 29, 2014

New Felt Cuffs on Etsy

Howdy!

My newest finally-finished felt wrist cuffs are listed on Etsy.

I made the felt myself with roving...really fun stuff.  They are flat but wrap around with a button enclosure.  Edges are wrapped with yarn or embroidery floss to secure the wool.  Because of their fairly large size and visual pop, I'd definitely consider these wearable art.  Click the photos to go straight to each listing.


Blue Wool Cuff Bracelet by AmyEclectic on Etsy


Wool Cuff Bracelet by AmyEclectic on Etsy
https://www.etsy.com/listing/216540345/colorful-felt-cuff-bracelet?ref=listing-shop-header-1
|
By the way, I'm also having an end-of-year sale on everything in my shop.  This includes new items, old items, clearance items, normal items, cheap items and pricey items.  Enter HNY33 to get 33% off of your whole single purchase.  Offer expires midnight December 31st, so get shopping!

Sunday, July 13, 2014

Cabochons/Buttons/Pendants on Etsy.

And there's more to come!

I'm digging deep into the chasms of my polymer clay stash, coming up with some fun stuff that I just know I won't finish to completion (as in buttons, bead embroidery, jewelry, etc).  For a while before I retired from polymer jewelry earlier this year, I went on a cabochon-making bonanza.  They are finished as far as cabs can go, but I know that there are creative folks out there who can use them in fabulous fiber art, embellishments and jewelry.   They are all small batch.  Click on the pictures to go straight to the listing on Etsy.  In the listing you will find out more about the techniques used, how they are finished, dimensions, etc.  I will be adding many more over the coming days.

Follow me on Facebook for more frequent updates. 

https://www.etsy.com/listing/196082958/2-horn-shaped-cabochons-pendants-or?ref=shop_home_active_1
Now THESE fiery things could end up in something really cool.
https://www.etsy.com/listing/196081592/3-round-buttons-cabochons-or-pendants?ref=listing-shop-header-1
Three different designs from the same chunk of clay.
https://www.etsy.com/listing/196080312/4-square-buttons-cabochons-or-pendants?ref=listing-shop-header-2
Like a circus.


Monday, January 28, 2013

New 2013 Work and New Blog

Hello friends and fans!

   2013 started with a terrible creative slump.  The cold dark days and holiday recovery just really got the best of me.  I toyed with the idea of just scrapping Ovenfried Beads altogether.  Honestly, I didn't think that I'd ever really be moved by polymer clay again. 

   Then I installed some lights in my new basement studio.  This Thomas doubts no more that there has to be an endless spring of creativity that just ebbs and flows.  Sometimes it's a torrential rush that turns into compulsive creation....and sometimes it trickles so slow that it seems like adding something to mashed potatoes is a genius idea. 

   I've been digging out beads that were packed up for moving.  A trip to the craft store resulted in some new findings that I've been needing for a while.  Classical music on public radio, even during the winter fundraising, set the mood.

   SO, as I posted on my Facebook page this morning, my big liquidation sale ends Wednesday.  I have new work to post, so if you happen to read this before January 30, get your behind over to my Etsy store and save a boatload on everything you like there.  Don't forget to enter the promo code!  If you forget, you will pay full price.  I just really don't have time to cancel transactions, relist and have someone re-buy them so that they can get the sale price.

   Wednesday night I will be putting it all back to regular price so I can freshen it up with new work.  These photos are items that will be available for sale.  (After they're posted I plan on linking them to the actual ad. If I remember.)

OH, and by the way....just one more thing to tell you.  I have a new blog that has absolutely NOTHING to do with Ovenfried Beads or my handcrafted art.  Photography is another one of my hobbies, so if you like neat pictures of nature and urban stuff (lots of closeups), just hop on over to my new photo blog: A Very Pedestrian Snail.  It's pretty much just all photos.


Thursday, May 10, 2012

30 turns into 40


Today I increased my whole-store sale discount to 40%, through May 18.  Coupon code is "MOM40".  This discount applies to everything in my store, including these amazing brand new earrings that I just made the other day.  (Regular price is $65...can be yours for $39!)
There is an Etsy shop event today protesting Etsy's allowance of mass-produced items being sold as handmade.  Although I completely agree that Etsy should maintain it's insistence that items be handmade by the shop owner (except, of course, in the instance of vintage and supplies), I need to be open.

More information about the protest and the reasons behind it can be read here.

Wednesday, June 10, 2009

YART Sale on Etsy, June 10-14 only!


Hey Etsy buyers! Starting today, ending Sunday, is the annual YART sale on Etsy, where sellers can have great deals and specials, sales and bargains, all at the same time.


My merch in my ovenfriedbeads store is all 20% off, and regularly-priced buttons in my ovenfriedbuttons store is also 20% off.


Remember, it's only through June 14~~!!

Wednesday, May 27, 2009

If I Were Ever Incarcerated.....


...I would immediately request to lead a crafters group. Give me my polymer clay, tools, seed beads and fabric and I would have a whole gang of women (no pun intended) creating a line of Prison Gear.

Creating small treasures is about as close to Nirvana as I can get on earth. Art is a therapist.
Above is a new pair of earrings......polymer clay cabashon made using the Stacker method, with Czech faceted glass and seed beads. Earwires are Saki silver. You can buy them on Etsy or come buy them at the Pendleton Art Center this Friday. I'm having a great sale....
Buy One Get One Free on ALL BUTTONS.

Buy Two Get One Free on ALL EARRINGS.


Visit my website for more info about Final Friday and my work.