A couple of weeks ago I was walking home from the bus stop and was intrigued by the cracks in several segments of the sidewalk. This sidewalk is just a couple of doors from my house.
About 4 days later I sketched it out on a white piece of paper. I liked the vertical orientation of the shape, and I shaded around it so I could decide what area would be a strong focal and what would be the "outside" of that shape.
Then I drew it much larger on a paper grocery bag. It's a good strong paper to use and is a great size. No gridding was used...it was all "eyeballed". This is a closeup of the larger piece. I assigned letters to the segments in the top half, and numbers in the segments of the bottom half. If I were to sneeze or the breeze blows in the studio too hard, I'd know at least which half the cut pieces would belong to.
Then it was time to trace it onto tracing paper. Michael's had a sale on it, so I was pretty lucky. Here is part of the piece in it's segments cut to size and roughly arranged in it's intended shape. I worked on the complex inner part before I traced and cut the outer part. The area you see below was going to be in the brown family to symbolize the strength of earth and rock.


Now it is time to cut. I used a brown marker to make the edge of the actual piece easier to see.
(Keep those scraps!!)

Now it is time to work on the background. Here are the pieces of tracing paper laid out, ready to match up to fabric. I chose blue hues to represent air and sky. I didn't take pics of all the steps of making the background.
Next step....bring it all together. I added some fabric "pebbles" I created a couple of years ago for situations just like this. When you need some kind of additional design element but you don't want to have to create a whole new stack of stuff to work with. The oval of pebbles visually holds it together very well and I think it helps balance it and keep the eye within the piece. I used brown hued pebbles on the blue fabric, and blue hued pebbles on the brown. Nice earthy contrast. I also added bands of blue to the top and brown to the bottom to contain the image and cover up the wonky pieces. I think the brown base really looks like a stable ground now.
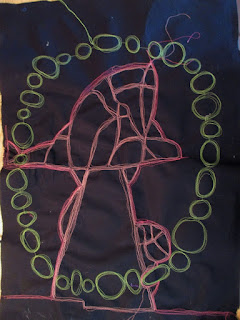
Now time to free-motion stitch! There is no batting sandwich here yet. Just the fused pieces to solid black background. I went around the shapes several times to "blur" the hard lines. The circle of pebbles is surrounded in a nice light grass green color to pull out the greens in the pebbles. You'll need to click on these photos to see the stitching.
Here is the back before I stitched around the blue segments. I wish I
had taken a final back picture before making the quilt sandwich. It's a little blurry but you get the drift.
After I made the quilt sandwich, I sewed a single line around the outer edge of the brown center shape. This was enough to hold the layers together. This will not go on a bed, so I'm not worried about batting slippage. This next picture is after I sewed the binding onto the front and wrapped it around the edge to the back. The Wonder Clips are great because you don't get poked.
Hand-stitching the binding on the back is one of my favorite parts besides designing the piece. I didn't photograph that part. I just wanted to get it done so I could take this last picture of the finished piece. It measures 16-1/8"x23-1/2". Wanted to get this step-by-step on the blog so you can see how I made this. I don't have a title yet but I do know that I am going to tackle some other broken sidewalk pictures and create a series. Hope you enjoyed my photo journal of this process!


