Showing posts with label fiber art. Show all posts

Thursday, November 10, 2016

Birth of My First Art Quilt

Over the years I have created a lot of quilty fiber art things.  Not traditional blocks, except maybe a log cabin with random fabric strips, but mostly made up.  Never really anything pictorial. Until now.  You can click on any of the photos to see them in a larger format.

A couple of weeks ago I was walking home from the bus stop and was intrigued by the cracks in several segments of the sidewalk.  This sidewalk is just a couple of doors from my house.


About 4 days later I sketched it out on a white piece of paper.  I liked the vertical orientation of the shape, and I shaded around it so I could decide what area would be a strong focal and what would be the "outside" of that shape.


Then I drew it much larger on a paper grocery bag.  It's a good strong paper to use and is a great size.  No gridding was used...it was all "eyeballed". This is a closeup of the larger piece.  I assigned letters to the segments in the top half, and numbers in the segments of the bottom half.  If I were to sneeze or the breeze blows in the studio too hard, I'd know at least which half the cut pieces would belong to.


Then it was time to trace it onto tracing paper.  Michael's had a sale on it, so I was pretty lucky.  Here is part of the piece in it's segments cut to size and roughly arranged in it's intended shape.  I worked on the complex inner part before I traced and cut the outer part.  The area you see below was going to be in the brown family to symbolize the strength of earth and rock.


 Then came the fusing.  I used the cut tracing paper pieces to cut out the pieces of fabric for each piece, allowing about 1/4" allowance around each piece so when I attached it to the fusible paper, I could cut them precisely.  Then I placed the pieces on the sticky side of the fusible paper (right side up) and ironed.


Now it is time to cut.  I used a brown marker to make the edge of the actual piece easier to see.


(Keep those scraps!!)

Next I placed the cut pieces (with the paper still on the back) on the original template to make sure they were cut well enough to fuse onto a backing fabric.  Looks good!


Now it is time to work on the background.  Here are the pieces of tracing paper laid out, ready to match up to fabric.  I chose blue hues to represent air and sky.  I didn't take pics of all the steps of making the background.

Here are the pieces of fabric fused in place.  I took a break from taking photos because I wanted to make sure the placement was good before I fused the pieces with a steaming hot iron.  Once it's down, it's down.


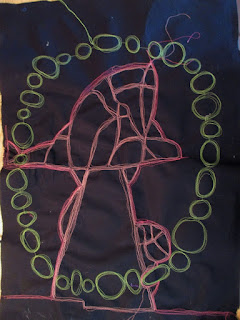
Next step....bring it all together.  I added some fabric "pebbles" I created a couple of years ago for situations just like this.  When you need some kind of additional design element but you don't want to have to create a whole new stack of stuff to work with.  The oval of pebbles visually holds it together very well and I think it helps balance it and keep the eye within the piece.  I used brown hued pebbles on the blue fabric, and blue hued pebbles on the brown.  Nice earthy contrast.  I also added bands of blue to the top and brown  to the bottom to contain the image and cover up the wonky pieces.  I think the brown base really looks like a stable ground now.

Now time to free-motion stitch!  There is no batting sandwich here yet.  Just the fused pieces to solid black background.  I went around the shapes several times to "blur" the hard lines.  The circle of pebbles is surrounded in a nice light grass green color to pull out the greens in the pebbles.  You'll need to click on these photos to see the stitching.


Here is the back before I stitched around the blue segments.  I wish I had taken a final back picture before making the quilt sandwich.  It's a little blurry but you get the drift.


After I made the quilt sandwich, I sewed a single line around the outer edge of the brown center shape.  This was enough to hold the layers together.  This will not go on a bed, so I'm not worried about batting slippage. This next picture is after I sewed the binding onto the front and wrapped it around the edge to the back.  The Wonder Clips are great because you don't get poked.


Hand-stitching the binding on the back is one of my favorite parts besides designing the piece.  I didn't photograph that part.  I just wanted to get it done so I could take this last picture of the finished piece.  It measures 16-1/8"x23-1/2".  Wanted to get this step-by-step on the blog so you can see how I made this.  I don't have a title yet but I do know that I am going to tackle some other broken sidewalk pictures and create a series.  Hope you enjoyed my photo journal of this process!


If you like what you see here you can get other craft updates on my Facebook artist page.  Lots of creative fun happening in the studio! 

Wednesday, September 2, 2015

Nature's Vessel and Nature's Creature

Seems like I'm always a little late on blogging about things that are time-sensitive.  I've confessed in the past that it's much more enjoyable to create items than talk about them.  Marketing my work is not one of my strengths, but this show is definitely worth talking about. 


Nature's Vessel
Nature's Creature

The Kennedy Heights Art Center in Cincinnati currently is exhibiting some AMAZING 3-D art in a show called Fibers: The Next Dimension...curated by Carole Staples, a woman whose confidence and encouragement in my own art has helped me really push some boundaries.  Two of my items, Nature's Vessel and Nature's Creature, were juried in to the show.  My work is on display with gorgeous fiber art from Cincinnati folks like Pam Kravetz, Robbie Porter, Robin Kusten Hartmann and Larry McKenna (not sure if I'm spelling his name right...will correct when I find out.).  Photos above depict my two pieces....the felted log on the bottom of the top photo, and the suspended figure on the bottom.  I did not catch the names of the pieces in the spaces my work shares, but I'll just say if you live in the Cincinnati area, you should go check out this show.  It offers a lot of great color and texture therapy and is on display through Saturday, September 26, 2015.

There is also a small gift shop that features gifty items by participating artists (but there is also another amazing gift shop right inside the front door.)  Yes, my pieces are for sale!  Treat yourself to something weird!  My selection of gifts consists of my "Femmes of the Forest" decorative art dolls, beaded portrait brooches (collaboration between me and Heather Zimmerman) and some felted wool cuffs and coffee cozies.

The KHAC has a gorgeous garden on the south side of the property.  Found another Monarch Butterfly today.  All smiles!

Monday, December 29, 2014

New Felt Cuffs on Etsy

Howdy!

My newest finally-finished felt wrist cuffs are listed on Etsy.

I made the felt myself with roving...really fun stuff.  They are flat but wrap around with a button enclosure.  Edges are wrapped with yarn or embroidery floss to secure the wool.  Because of their fairly large size and visual pop, I'd definitely consider these wearable art.  Click the photos to go straight to each listing.


Blue Wool Cuff Bracelet by AmyEclectic on Etsy


Wool Cuff Bracelet by AmyEclectic on Etsy
https://www.etsy.com/listing/216540345/colorful-felt-cuff-bracelet?ref=listing-shop-header-1
|
By the way, I'm also having an end-of-year sale on everything in my shop.  This includes new items, old items, clearance items, normal items, cheap items and pricey items.  Enter HNY33 to get 33% off of your whole single purchase.  Offer expires midnight December 31st, so get shopping!

Monday, July 14, 2014

Marbling Fabric = Science Art


My newest Etsy listings for marbled fabric mention that I have a deep creative interest in science, namely biology.  Astronomy and geology rank a tight second.  I am fascinated with natural design with fractals and interconnected patterns, fluid dynamics, repetition and shapes/structures.  Patterns and designs that can are similar in minute and large scales are very appealing to me.  If you open a random biology, zoology or other related natural science textbook, you'll see images that can be achieved in a myriad of way artistically, including illustration, painting, or achieved through the "random" use of paint on a liquid.

Marbling fabric is my way of satisfying my need to see natural forces at work with little control from my end.  This is where fluid dynamics and chemistry come to play. The final image is where a moment of movement is frozen in time and preserved.  And that's where one of the hardest parts of marbling come in....knowing when to stop adding dye, stop swirling, stop manipulating, and drop the fabric down.  It is a most gratifying activity, and it's amazing to see what manifests when I know darn well I couldn't have invented it in my head first.  I can visualize (which is a foundation of creating), but I never know how it will end up looking.  Typically when I pull the fabric up off of the base medium, the first thing that comes out of my mouth is "Holy s#%t, that is AMAZING!"  Every time.

Here is a video from Interweave that skipped the prep work and goes straight to the fun part of marbling fabric.


\

Below are images of my own marbled fabrics.  These pieces really are little works of art, created by the Universe with a little nudge from me.  If they were hand-designed, painted, illustrated or otherwise created using paint from a brush, a marker or another slow process, they'd be very laborious, thus very expensive.  The fact that it's on fabric adds another dimension of longevity and use...if it gets damp, it won't be destroyed.  It can be sewn, embroidered, embellished, over-dyed, quilted, or otherwise altered by an artist who needs a framework or base to work from. They can also be framed as they are.  If you are interested in seeing more photographs of each of these and designs not shown here, click on the photos to go straight to the Etsy listings.  Purchasing is possible there.  If the act of marbling fabric interests you, there are lots of sites and books out there to help.  I highly recommend you do it outside or on concrete floors.  Give yourself a whole day to it to really immerse yourself into it.  Pun intended!


Marbled Fabric by Ovenfried Beads on Etsy

Marbled Fabric by Ovenfried Beads on Etsy

Marbled Fabric by Ovenfried Beads on Etsy

Marbled Fabric by Ovenfried Beads on Etsy

Marbled Fabric by Ovenfried Beads on Etsy

Marbled Fabric by Ovenfried Beads on Etsy

Marbled Fabric by Ovenfried Beads on Etsy

Sunday, July 13, 2014

Cabochons/Buttons/Pendants on Etsy.

And there's more to come!

I'm digging deep into the chasms of my polymer clay stash, coming up with some fun stuff that I just know I won't finish to completion (as in buttons, bead embroidery, jewelry, etc).  For a while before I retired from polymer jewelry earlier this year, I went on a cabochon-making bonanza.  They are finished as far as cabs can go, but I know that there are creative folks out there who can use them in fabulous fiber art, embellishments and jewelry.   They are all small batch.  Click on the pictures to go straight to the listing on Etsy.  In the listing you will find out more about the techniques used, how they are finished, dimensions, etc.  I will be adding many more over the coming days.

Follow me on Facebook for more frequent updates. 

https://www.etsy.com/listing/196082958/2-horn-shaped-cabochons-pendants-or?ref=shop_home_active_1
Now THESE fiery things could end up in something really cool.
https://www.etsy.com/listing/196081592/3-round-buttons-cabochons-or-pendants?ref=listing-shop-header-1
Three different designs from the same chunk of clay.
https://www.etsy.com/listing/196080312/4-square-buttons-cabochons-or-pendants?ref=listing-shop-header-2
Like a circus.


Sunday, June 22, 2014

Hot Date in the Art Studio

Last night was a great "date" night between me and my art supplies in the studio.  I worked on some bases for the Femmes pictured here.  The bases are made of Ultra-Light polymer clay, then covered with regular Sculpey III, Fimo Soft or Premo, depending on the color. The Ultra-Light is amazing...easy to mold, not sticky.  If you use the Ultra-Light and happen to paint it, I'd love some tips on what kinds of paints stick well to it.  I've tried a few things but so far I'm not terribly happy with what I've come up with.  Alcohol inks seem to penetrate plastic well, but as far as brush-on....well the verdict is still out on that. 


Later I started my second sari-strip scarf.  Decided to start with reds and oranges on one part, then will merge some blues and purples into another half.  I'm kind of addicted to ironing the strips right now.  As of this morning, the strips you see below are now sandwiched and pinned between 2 layers of Sulky Ultra-Solvy stabilizer.  When the blue/purple half is finished and attached, I'm going to sew the sandwich lengthwise in large arcs and sweeping curves to make sure all of the sari strips are connected.  When I'm satisfied that I've sewn enough, I will submerge the whole scarf in some water and work the water soluble Ultra-Solvy out of the scarf.  This will be a "beefier", more substantial scarf than the one at work that I made.


Sunday, March 24, 2013

Addicted to Fiber

Working in a yarn and fabric store means a lot of things.  For one, I am surrounded by amazing things that I could never afford.  Most of it is totally within the realm of my pocketbook, over time.  But the cool thing is, I can be around it, talking about it, teaching about it, squeezing and touching it, five days a week, and get paid to do it.  (Although, some of my paycheck does go right back into the store....cycle of life, right?)

Then there's the other part. Being around it so much means I have a LOT of ideas of what to create.  I want to create so much more than I will ever have time for, and it often overwhelmes me.  Unless someone comes by, sweeps me off my feet and says, "Live your dream, Amy....I'll take care of the rest," sewing, knitting, polymer clay, paper cuts, you name it.... will always be for my time away from work.  Sometimes I want to lock myself into the house for a week and just see what happens.


So here's part of my newest yarn acquisition.  Malabrigo Worsted Weight ....merino wool....a perfect felting fiber.  I've gotten it in my crazy head that instead of buying wool to cut, stitch, embellish, and sculpt, I can make my own felt fabric.  And will I!  This is going to have to wait though, because I spent over 10 hours in the last week working on a giant scarf (approximately 6-1/2 feet long, and very wide) that I finished at 11:05am this morning.  Technically I still need to weave in the tails, but I wore it to work today and people loved it. 

My next project will be featured in my next post.  Here's a hint:  My mom left me with 19 pieced quilt squares that I discovered only after she died.  There will be photos.